Wednesday, January 28, 2009

Windows XP TechTip #13 >> OEM Info


Cool, eh?

You can easily change your OEM logo and info by following these simple steps:

  1. Locate the files OEMINFO.INI and OEMLOGO.BMP in your system32 folder.
  2. Create backup copies of the files.
  3. Just run "system32" and you'll be taken to this folder.
  4. Modify the the files to your heart's content.
  5. Just don't forget that the OEMLOGO.BMP file should be a 180 x 114, 256 Color bitmap file.
Alternatively, do a google-search using "oem logo changer +freeware" as search keys, you should have no problems finding one.

It's up to you which method you prefer; personally I'd do simple stuff like these on my own.

That's it. ^__^

Monday, January 26, 2009

Demonoid Account

------------------------------------
Update: 5 more invites left!
------------------------------------

Demonoid.com is a good torrent site. Many a famous torrents are uploaded here; you may have noticed most torrents have the "Torrent_downloaded_from_Demonoid_com.txt" file with it.

After months of futile searching for an invitation code, I finally got one from a friend staying somewhere in Dubai.

To pay the favor forward, I could possibly give 5 more invitations to people interested in joining the demonoid community. But I should quote first the demonoid team:

------------------------------
Please note: To avoid abuse, invitations are limited. Also, if someone you invite gets warned/banned, you might get warned/banned too.

Please do not try to sell your invitation codes. It is against site policy. Thank you!
------------------------------

So I am giving you an invitation code on one condition, three actually:
  • You give your word that you won't get me banned.
  • You give your word that you won't sell the code.
  • Pay it forward.
Of course, I can't be sure and I can't even trace you if you would violate any of these, so I can only virtually trust you.

That's it. Just give me a holler and I'd give you the code.

Friday, January 23, 2009

Swap X and Y...

I have been asked this programming question more times than I can remember now.

Question:

Given two variables x and y, how would you swap their values without using a third variable?

Think...

Hmm...

Umm...

Ohhh...

Answer:
------------------
x = x + y;
y = x - y;
x = x - y;
------------------

That's it... ^__^

Tuesday, January 20, 2009

Windows XP TechTip #12 >> Shortcuts

Hotkeys or shortcut keys increase your computing productivity tenfold.

Here's a few of them that you could definitely use for your everyday computing.

[Windows Button]+D Hides/shows the Desktop
[Windows Button]+L Locks the workstation (Thanks to ngehehe)
[Windows Button]+R Spawns a "Run" dialog (Thanks to kimo)
[Windows Button]+F Launches the Search module
[Windows Button]+E Starts the Windows Explorer
[Windows Button]+PauseBreak Shows the System Properties

Actually, I am encouraging you to use them always.

They really help a lot. ^__^

Wednesday, January 14, 2009

Windows XP TechTip #11 >> Disable Autoplay

Autoplay is one feature heavily exploited by USB drive virii.

So the usual scheme we deal with it is to disable the autoplay feature using the group policies, which, sadly, is NOT available to XP Home users.

Even so, simply turning off autoplay from the group policies isn't enough because explorer's "autoplay" context menu is still active.

Consequently, double-clicking the infected USB drive from My Computer still executes malicious scripts from the infected flash drive and in the end, your computer still gets infected.

Here's a fool-proof way to totally KILL the autoplay feature.


It works for XP Home users as well.

1. Create a blank text file then paste the following to it.

Windows Registry Editor Version 5.00

[HKEY_CURRENT_USER\Software\Microsoft\Windows\CurrentVersion\Policies\Explorer]
"NoDriveTypeAutoRun"=dword:000000ff

[HKEY_LOCAL_MACHINE\SOFTWARE\Microsoft\Windows\CurrentVersion\policies\Explorer]
"NoDriveTypeAutoRun"=dword:000000ff

[HKEY_LOCAL_MACHINE\SOFTWARE\Microsoft\Windows NT\CurrentVersion\IniFileMapping\Autorun.inf]
@="@SYS:DoesNotExist"


2. Save the file as a registry file (e.g. KillAutoPlay.reg) or you can just download the file from this link.
3. Double-click the .reg file.


4. Select "Yes". Hit Enter.

Goodbye autoplay!

That's it... ^__^

Monday, January 12, 2009

Windows XP TechTip #10 >> Cmd Here

The "cmd" shell is commonly used to execute console programs or batch files.

The irritating thing is this: more often than not, the location of these files is not that very intuitive to traverse due to the nature of the cmd console interface.

This tool can help you open a cmd shell, the initial path of which is pointed to the location of your choice:

Cmd Here


How to Use:
  1. Download from the link and install.
  2. Locate the folder where you put the console program.
  3. Right-click on it.
  4. Select "Open Command Window Here".
  5. Eureka! The initial path is set to the folder you chose.
That's it... ^__^

Friday, January 9, 2009

Rapid Clicker v1.1

Update:
---------------
RapidClicker v1.0 has a major bug -> the frame of the window is NOT ALWAYS transparent because I have hard-coded the transparent color. The issue has been fixed in RapidClicker v1.1.

Kindly, redownload the file from this link.
---------------

I could think of a few games that require you, the player, to rapidly pound on the left mouse button.

Your problem has just been resolved.

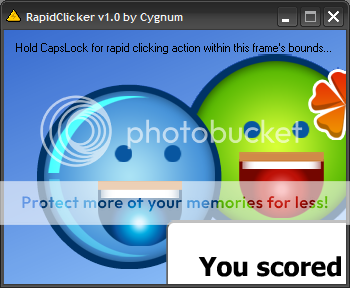
I've coded a tool that simulates rapid-clicking on the current mouse cursor position.

May you find this tool useful:

Rapid Clicker v1.1 (C++)


How to use
  1. Run program.
  2. Drag and resize the window to encapsulate the area you wish to rapid-click on.
  3. Press and hold CapsLock to initiate.
  4. If you have a powerful computer, you can run multiple instances of this program for an even faster clicking action.
Comments, suggestions, bug reports? Just notify me. ^___^

Windows XP TechTip #9 >> Location

Having tons of files in the same drive as the OS introduces unnecessary head reads to your physical disks; consequently leading to slower computer performance.

It is advised that you put your files in a separate partition or if possible, a separate physical drive for optimum hard disk operation.

Simply put, I highly recommend changing the default "My Documents" and "Desktop" location in your machine; guessing that the bulk of your files are commonly placed in these folders.

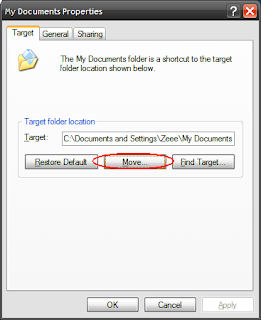
To change the location for "My Documents", right click the "My Documents" folder then select properties. On the screen, click Move and select the folder of your choice.


To change the desktop location, load the registry editor by running "regedit". Open the "HKEY_CURRENT_USER\Software\Microsoft\Windows\Current Version\Explorer\User Shell Folders" key and change the "Desktop" attribute to a folder of your choice.


You can also change the location of My Documents using this method.

Personally, I put my desktop and my documents in the same folder (e.g. D:\Files) so I that's:

D:\Files\Docs
D:\Files\Desktop

(assuming XP is installed in drive C:)

That's it. ^__^

Tuesday, January 6, 2009

The EXE packer, UPX

This tool is mainly useful for programmers who want their releases packed to the bone.

Everyone can still use it for shrinking any executable (.exe file), though.

UPX v3.0.3


How to use:
  1. Download the package from the official website or just the zipped program as provided in this link.
  2. Extract the contents of upx.zip and move upx.exe to C:\Windows or any of your folders included in the PATH system variable.
  3. Run a cmd shell and change path to the target EXE file.
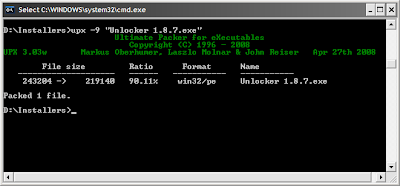
  4. Type in "upx -9 <Exe FileName>" for maximum compression.
Note: Just run upx for a list of available command parameters.

That's it.

Visit the official website here.

Monday, January 5, 2009

Windows XP TechTip #8 >> Defaults

You have already set Firefox as your default browser but clicking on web links still loads the page using IE.

This is a common problem for people using multiple browsers. Sometimes answering this prompt is not enough:


To set things straight, run "Set Program Access and Defaults" by:
  • Running "appwiz.cpl" or Control Panel -> "Add or Remove Programs", then selecting "Set Program Access and Defaults"; or
  • Press the Windows button, then click "Set Program Access and Defaults"
Now, click "Custom", then select the browser you want to set as default.


You can look around and tinker with other settings.

That's it. ^__^

Saturday, January 3, 2009

Launchy v2.1.2

Here's a tool to launch applications quickly and intuitively.

Launchy v2.1.2


How to use:
  1. Download from this link and install.
  2. Press Alt+Space. (You may change this in the program preferences later)
  3. Type in a substring of the application you want to launch. E.g., type in "w" and applications containing this letter should appear in a list.
  4. Choose an application and hit Enter.
That's it. ^__^

Visit the official website here.

Friday, January 2, 2009

Windows XP TechTip #7 >> Shutdown

Shutting down windows normally doesn't always work.

Oftentimes you'd wake up in the morning wondering why your PC is still on while you can clearly remember clicking "Turn off" on this dialog:


What happened?

Some persistent programs failed to terminate during the shutdown sequence and the OS is waiting for it to do so.

That's roughly 8 hours of pointless power consumption you'd pay in your electric bill. Damn.

You can avoid this by running:

"shutdown -s -f -t 10"

This gives you 10 seconds to think if you want to abort the shutdown or not. Run this to abort the sequence:

"shutdown -a"

Note: This command is also useful for aborting the 60-second shutdown sequence initiated by the then popular Blasterworm virus.

Should you simply want a restart, this command should do:

"shutdown -r -f -t 10"

For a full description of what the parameters mean, run "shutdown" from the command shell, a.k.a. the "cmd".

Alternatively, you can create batch files placed on the desktop or the quick launch toolbar to run these commands.

Just type in any of these to a text file, then save as "Shutdown.bat" for instance.

That's it.

Thursday, January 1, 2009

Unlocker v1.8.7

Select RapidClicker.exe.

Shift+Delete.


Aarrgh!

Never fear, Unlocker is here!

Unlocker v1.8.7


How to use:
  1. Download the installer from here and install.
  2. Right-click the magic-wand-like system tray icon.
  3. Uncheck Autostart, you don't need this assistant.
  4. Do step 2 again and click Close.
  5. Now, right-click on the file or folder you can't delete and select Unlocker, this should be just right above the "Send To" item.
  6. Unlocker launches and you see the list of processes and programs locking the file.
  7. Select the desired action.
Note: Sometimes some files could only be deleted on system startup.

That's it. ^__^